This guide is intended for Ubuntu users (it may work on other Linux distro though).
If you are running TOMBOY 0.15.6 or later, all your TOMBOY notes are stored on ~/.local/share/tomboy/. You can change its default directory for your notes. This especially makes sense if you dual boot Ubuntu for example with Windows so you only want the same notes accessible from both OSs.
Open terminal then run these commands:
1. sudo cp /etc/profile /etc/profile.bak
(make backup of /etc/profile into /etc/profile.bak)
2. sudo gedit /etc/profile
(edit /etc/profile)
3. copy and paste this line (without quotes): "export TOMBOY_PATH=/media/STORAGE/Tomboy_notes". This will set up "/media/STORAGE/Tomboy_notes" for your Tomboy PATH. Change "/media/STORAGE/Tomboy_notes" accordingly to what directory you want to store your notes.
4. Restart the system and now Tomboy will read notes stored in that directory.
Good luck.
Tuesday, July 13, 2010
Friday, May 14, 2010
Add Reminder Add-in on Ubuntu 10.04 (Lucid Lynx)
Earlier I showed steps to add Reminder add-in on earlier version of Ubuntu (
http://gusantov.blogspot.com/2008/07/event-reminder.html). This note is about how to add Reminder add-in on Ubuntu 10.04 (Lucid Lynx). I wrote this because there's slightly different in the way the add-in files of Tomboy are stored. In earlier versions of Ubuntu (correct me if I'm wrong), add-in files are stored in ~/tomboy/addins. In Ubuntu 10.04 these files are stored in /usr/lib/tomboy/addins.
So, if you want to add Reminder add-in, after you download the dll file (I choose the binary one) (http://flukkost.nu/blog/tomboy-reminder/), then move it to /usr/lib/tomboy/addins. You need to enable it (see my previous note) afterward. If you can't see Reminder add-in in there, you need to restart your system (this is what I did to make it appear on the add-ins list).
Good luck.
Wednesday, September 2, 2009
Transparent Dropdown Menu
 This tutorial is answer question "how to make my dropdown menu transparent?". Here is how to it.
1. Open CCSM (CompizConfig Setting Manager) then enable Opacity, Brightness and Saturation (see picture).
2. If you have nothing underneath, then specify what type of window you want (e.g. dropdownmenu). Add the type of window by clicking NEW (see picture).
3. Adjust the level of transparency you like by cha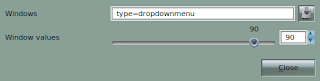 nging the the "Window values", the value of 90 is pretty good.
For more information, follow this link http://wiki.compiz-fusion.org/WindowMatching
That's it.
2. If you have nothing underneath, then specify what type of window you want (e.g. dropdownmenu). Add the type of window by clicking NEW (see picture).
3. Adjust the level of transparency you like by cha
 nging the the "Window values", the value of 90 is pretty good.
For more information, follow this link http://wiki.compiz-fusion.org/WindowMatching
That's it.

Friday, May 8, 2009
You messed up your Compiz
Ok, you like Compiz desktop effect with its cool features such as 3D desktop, wobbly effect, etc. Then you play around to explore more features you want to apply. Suddenly your desktop messed up, such as your mouse behave strange, you can't click the menu for instance. Don't get nervous, relax. You tried uninstall Compiz and clean install it but still no luck. Take deep breath.
This tip is a special guide if you experience the same problem with me. After clicking here and there setting up your Compiz, then your mouse seem behaves abnormal, it won't click the menu. It happened to me after I enable "window move" feature by setting a particular key binding (I didn't remember what keys I selected). After trying removing then reinstalling the Compiz, I came up an idea to click the menu with combination between "shift" button and mouse click. It worked. So then I setup my Compiz again and click on "window move", I set the key binding to its default and tha da, it's back to normal again.
So if you experience anything similar like that, don't get panic, try all possible options.
Good luck.
Thursday, April 30, 2009
Ubuntu 9.04
What I usually did when a new version of Ubuntu has been released was testing it with the live CD. I want to have an impression before i decide whether or not I will upgrade my system. The same thing I did when Ubuntu 9.04 (code name Jaunty Jackalope) has been released a few days ago.
I have been really amazed with the capability that Ubuntu 9.04 has now offer. I tested the live CD on my Sony Vaio VGN-NR120E. From the past versions, I usually have problem with the wireless connection. With this new version, everything is flawless, including the wireless connection, it was working just by inserting the live CD, without installing anything. It detect all available wireless networks including my home network.
I really want to upgrade my system to this new version of Ubuntu. Unfortunately I have to wait a little bit longer. Now I'm in the middle of something which is urgent to do,finishing my study.
Once this is done, I promise, I will upgrade my Ubuntu 8.10 version with the newest one, maybe not 9.04 but 9.10 version.
Happy upgrading (if you find anything bad with 9.04 version, please give me a shout).
Friday, December 12, 2008
Install Offline English Dictionary

If you're looking for a free English dictionary to install onto your computer. But why do we need to install an offline-dictionary software if it's available online? Simple, if internet connection is not cheap to pay, then this is the solution. I recommend Stardict. It's a free-opensourced software with a lot of dictionary to choose.
"StarDict is a Cross-Platform and international dictionary Software. It has powerful features such as "Glob-style pattern matching", "Scan selection word," "Fuzzy query," etc. Stardict Version3.0 has developed a lot of new functions, such as Full-text translation, Net Dict.
Thousands of free dictionaries can be found on the internet. Choose your own favorites". (http://stardict.sourceforge.net/index.php)
Below is the steps to install it on Ubuntu (for other Operating Systems, do similarly):
1. Search and install Stardict (including the depencies) in your Snaptic Package Manager.
2. Download any dictionary you like from http://stardict.sourceforge.net/Dictionaries_dictd-www.dict.org.php
For example Longman Dictionary of Contemporary English (Free to use, 6.4M, 43052 words)
3. Extract the downloaded file by
tar -xjvf filename.bz2
then move it to /usr/share/stardict/dic (use sudo mv if necessary)
4. Try to open it: Application>Accessories>Stardict
5. Enjoy
Tips:
If you want it to be interactive, check "scan" in the left bottom of its window (click the screenshot above to enlarge). If you are clicking any word in any window application, Stardict will search in its dictionary the definition of the clicked word.
Tuesday, October 28, 2008
Suspend problem fixed on Ubuntu
On my previous post regarding wireless problem on my Sony Vaio VGN-NR120E, the problem was fixed using madwifi-ng-r2756+ar5007.tar.gz driver version. Though, the driver conflicts with suspend ability so since then my laptop lost its ability to suspend.
Both of my wireless and suspend problem have been fixed after following this link
http://ubuntuforums.org/showthread.php?t=792158. (Thanks to bmartin who provides the detail guide).
Below is the steps:
1. If you installed another driver, please uninstall (make uninstall) it and clean (make clean) it.
2. Copy and paste these commands onto your terminal
4. After that, you'll see your wireless connection (in my case, it did work). When I tried to suspend, wow, it worked, it really did.
Good luck!
Both of my wireless and suspend problem have been fixed after following this link
http://ubuntuforums.org/showthread.php?t=792158. (Thanks to bmartin who provides the detail guide).
Below is the steps:
1. If you installed another driver, please uninstall (make uninstall) it and clean (make clean) it.
2. Copy and paste these commands onto your terminal
sudo aptitude update && sudo aptitude -y install build-essential linux-headers-$(uname -r)3. Restart you system
cd ~
wget -O driver.tar.gz http://snapshots.madwifi.org/madwifi-hal-0.10.5.6-current.tar.gz
tar xf driver.tar.gz
cd madwifi-*
make
sudo make install
echo ath_pci | sudo tee -a /etc/modules
sudo modprobe ath_pci
4. After that, you'll see your wireless connection (in my case, it did work). When I tried to suspend, wow, it worked, it really did.
Good luck!
Subscribe to:
Posts (Atom)